Build Smoke Detector with Raspberry Pi

In this tutorial series, I'll show you how to build a fully functioning smoke detector from a scratch using your Raspberry Pi and few other components for less than 20$. Our little device will be capable of sending real-time updates to the client, draw nice-looking graphs in the web browser and send email notifications when the smoke is detected.
We will also add a buzzer which will beep when the smoke is detected! That's optional of course, but I thought it would be a nice addition!
Now while we're going to build a working example of a smoke detector, the main purpose of this tutorial is to show you how you can use your Raspberry Pi and Python to develop real-time web applications for remote monitoring of various sensors, be it temperature, moisture, pressure... you name it.
For this tutorial I'll assume you already have your Raspberry Pi set as Headless Raspberry Pi.
Alright, I hope you're as excited as I am, let's get started!
Shoping list!
Besides Raspberry Pi, for this project we will need:
- MQ-2 LPG I-butane Propane Methane Alcohol Hydrogen Smoke Gas Sensor Module ~ 1.3$
- 16 Bit I2C ADS1115 Module ADC 4 channel with Pro Gain Amplifier ~ 2.4$
- 2 Channel IIC I2C Logic Level Converter Bi-Directional Module 5V to 3.3V ~ 1.1$ for 5pcs.
- 30CM Male to Male + Female to Male + Female to Female Jumper Copper Wire Dupont Cable DIY KIT ~ 1$ each.
If you're adding a buzzer we will also need few additional components that can be found in this cheap electronics kit.
-
Electronics Components Basic Starter Kit (LED Potentiometer Buzzer Capacitor Resistor Component Kit)
Some theory behind MQ2
The main component we'll be using here besides Raspberry Pi itself is MQ2 Gas Sensor Module. This gas sensor is perfect for measuring LPG, Smoke, Alcohol, Propane, Hydrogen, Methane and Carbon Monoxide concentrations in the air. These concentrations are represented as Parts-per-million (abbreviated ppm). In our case, we'll be detecting particles commonly found in smoke, but you can follow this tutorial to build a device that is perfectly capable of, for example, detecting some sort of gas leakage and so on.
For an in-depth explanation of MQ2 you can check this link here, but essentially what it does is that it returns the output between 0 and 5 volts depending on the concentration of those gases in the air as an analog signal. We'll use our Raspberry Pi (RPi) to read this signal.
Now while that sounds simple, there are two technical issues here that complicate our project a little bit. One is that RPi can't read analog signal directly. We'll need to use an analog-to-digital converter (ADC), because RPi has no ADC built into it.
ADS1115 is great for this task as it's 16-bit resolution should give us very accurate readings. The second problem is that RPi GPIO pins are only 3.3V tolerant and our ADC will operate at 5V. In order for these devices to communicate safely we have to put 5V to 3.3v bi-directional logic level converter between Raspberry Pi and ADC.
You might have noticed that this specific MQ2 module that we have here has an additional digital pin marked as D0. This means that it would be possible to connect MQ2 without ADC and use the potentiometer on the module to manually set the voltage level at which the digital output would become HIGH but the problem here is that we wouldn't be able to detect specific gases and or get the exact values if we took this approach.
Lastly, I'm using a buzzer with an NPM transistor. While it is possible to connect buzzer directly to GPIO because most hobby buzzers don't draw much current I still don't recommend doing that, because the current output is very limited on GPIOS and you might damage Raspberry Pi this way in case you're using different buzzer than me. So let's connect our buzzer to 5V and use a transistor as a "switch". We will also add a 1k Ω resistor between GPIO and transistor. This resistor will limit the current flowing through the transistor to prevent it from damaging.
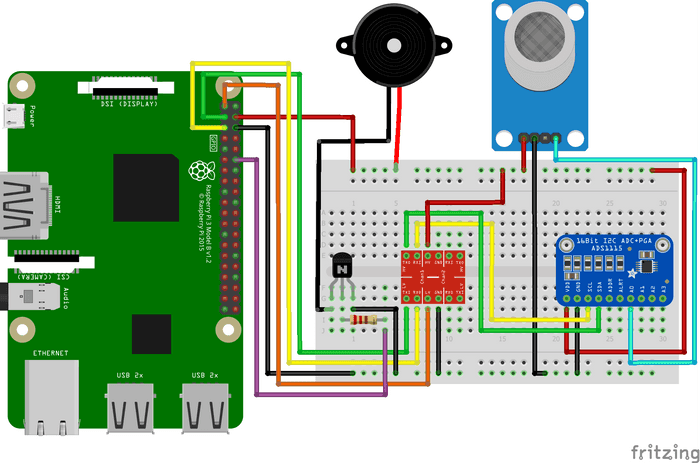
And that's basically it. The schematic for wiring is below. So grab your soldering gun and a breadboard and let's get to work!
The wiring
So the fuil circuit as follows : Raspberry PI -> Logic Level Shifter -> ADC -> MQ2. This schematic should be self explanatory, but just to make few things clear, the red wire is 5 V which are provided by our RPi, but you can use an external power supply if you wish. Also notice the that we have to provide 3.3V to Logic Level Shifter by connecting orange wire to LV and then 5V to HV.
The black wire is the common ground - GND.
Green wire from GPIO2 goes to LV1 and then from HV1 continues to SDA of ADS1115.
Yellow wire from GPIO3 goes to LV2 and then from HV2 continues to SCL of ADS1115.
MQ2's A0 (analog) pin is connected to A0 on ADS1115.
Corcerning the buzzer, middle pin (base) is connected to GPIO18. (don't forget a resistor in between)
If you still have questions concerning the wiring, leave the comment.
Notice that if you're using the same Logic Level Converter as me, the LV and GND are switched in places and we have LV1
and LV2 instead of TX1 and RX0 on the LV "side" and HV1 and HV2 on the HV, opposed to what's shown in the schematic.
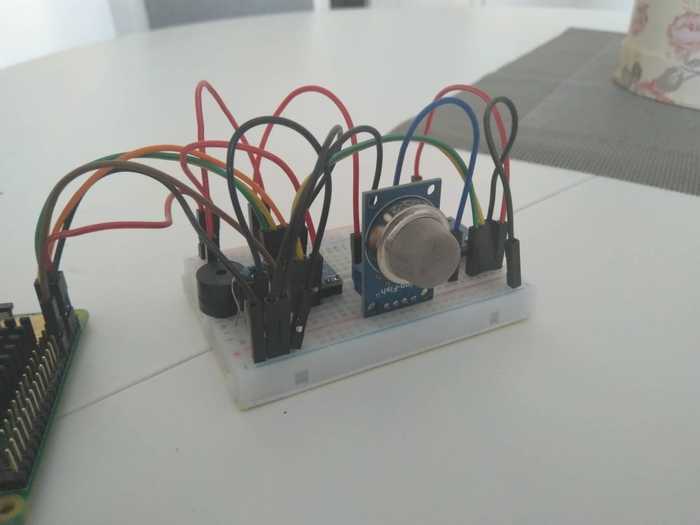
Here's how it looks with everything connected.
Testing the wiring
Now that we have everything connected, let us boot our RPi. The next thing we'll have to do is to enable the I2C interface on our RPi, which is disabled by default. You can read more about I2C and what it does here, but for now, all we need to know is that it's a serial communication protocol that uses two wires to transmit data between devices.
Right, so to enable I2C type:
sudo raspi-configUnder Interfacing Options enable I2C. You might need to do sudo reboot here.
Now in the command line type:
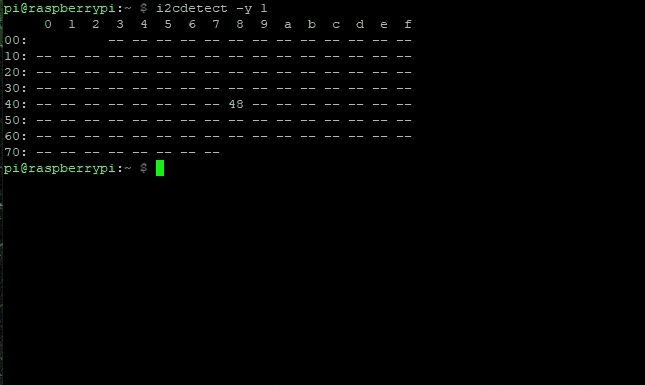
i2cdetect -y 1This outputs a table with the list of detected devices on the I2C bus.
Notice the 48. That's the hex address of our ADC.
On older RPi's or different Raspbian versions you might need to replace 1 with 0 or manually install i2c-tools with sudo apt-get install i2c-tools. Again if you're getting an error like this: Could not open file /dev/i2c-1' or /dev/i2c/1': No such file or directory, you probably need to reboot your Pi.
Hopefully, you're seeing something like this by now. If that's the case, let's start building our web application using Python!
Building the app
Before we dive into the code, I wanted to talk about the architecture of our app and the tools we're going to use. The idea here is to run a background process in our web application that continuously measures the concentration of smoke in the air. Then we want to visualize this data in a browser. To accomplish these goals, we will use Flask, which is a lightweight and easily extensible web framework for Python.
Besides Flask itself, we will also use a Flask extension called Flask-SocketIO, which gives Flask application access to real-time bi-directional communication between the client and the server, instead of request/response type of communication. Simply put, this will allow us to get constant updates without needing to refresh the page.
You can check this tutorial by the creator itself, Miguel Grinberg. Miguel in detail explains what Flask-SocketIO is and how it works.
And if you're totally new to this real-time web stuff and want to learn more about it, watch this this video on youtube A Beginner's Guide to WebSockets.
For the actual graphs on the client side, we will use a Javascript library called Chart.js.
Getting the code
The code for this project is stored on Github. Let's grab it by typing
cd ~
git clone https://github.com/Onixaz/rpi-smoke-detector.git
if you don't have git, install it with sudo apt-get install git-core or simply download the code from the repository with sudo wget or download it directly from the Github web page and place it in your RPi.
We'll discuss our code along the way, but first I wanted to show you the basic usage of the sensor with RPi.
Virtual environment and required packages
To do that, we'll start by setting Python3 virtual environment to isolate our project.
While the virtual environment part is optional, I highly recommend it, as it helps with package dependency management between different projects.
First, we need Python 3 virtual environment package itself.
In our terminal let's execute:
sudo apt-get install python3-venvNow let's navigate to our working directory. I'll assume that you cloned the repository. In that case:
cd rpi-smoke-detectorThen while we're in our working directory
python3 -m venv venvThis will create a virtual environment in our working directory called venv. You can name it whatever you like, but I always name them venv for the convenience.
Now to activate it:
source venv/bin/activateVirtual environment needs to be activated every time you open a new terminal window. To deactivate the virtual environment simply type deactivate in the terminal.
Notice the (venv) besides your pi@raspberrypi. This means we're in our virtual environment and we can now install our project dependencies with:
pip install -r requirements.txtSpoiler alert: might take a while as this will install all dependencies that we'll need for this project :)
Playing with the sensor!
While we're in our working directory (rpi-smoke-detector if you cloned the repository) type the following in the command line:
pythonNow while we're in the Python interpreter.
from gas_detection import GasDetectionNext, we instantiate our GasDetection class.
smoke_detector = GasDetection()Wait 20 seconds for it to calibrate. This should be done in the fresh air.
Now that it is done calibrating,
ppm = smoke_detector.percentage()This will return us an object of all gases and their concentrations in the air. Let's check the smoke.
smoke_value = ppm[smoke_detector.SMOKE_GAS]Finally, print the value to the screen!
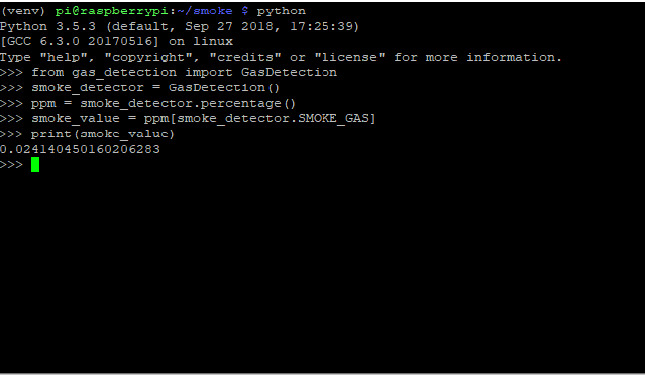
print(smoke_value)You should see something like this:
And...there you go! Thats how many smoke particles you have around you ! Don't forget thats ppm (parts-per-million), means thats probably a very small number, no need to panic.
One thing to note here is that users around internet reporting that accurate values appear after about 48 hours, but I can't confirm nor deny this fact.
For other gases, check this example by the guy filips123 who wrote the actual GasDetection package.
Running the web application
Quit your Python interpreter and let's actually see our web application in action. In the terminal:
python app.pyWait for the server to start. Don't forget it needs to calibrate the sensor.
Now in the browser navigate to your RPi's IP address. The default port is 5000.
Ha! Seems it's working!
Not the best looking UI obviously :) Feel free to add some css if you wish.
Understanding the code
Now that we know how the sensor works and you've seen web application in action, let's take a look at app.py which resides in your working directory.
Looking at the code, apart from some imports and some Flask related stuff, you'll notice that it's basically the same thing we did previously but now it's being run in the while True loop!
#app.py
def background_sensor_reading():
    global last_epoch
    while True:
        time.sleep(config['sensor_reading_delay'])
        ppm = smoke_detector.percentage()
        smoke_value = ppm[smoke_detector.SMOKE_GAS]
        socketio.emit('readings', {'value': smoke_value})
Notice the last line.
#app.py
socketio.emit('readings', {'value': smoke_value})
That's SocketIO (library behind Flask-SocketIO) specific syntax and it does what it actually says it does, it emits our smoke_value to the clients connected to our web server as a message (also called an event) 'readings'.
Now let's take a look at index.html which resides in the templates subdirectory.
//index.html
socket.on('readings', function (msg) {
      var length = data.labels.length
      if (length >= 20) {
        data.datasets[0].data.shift()
        data.labels.shift()
      }
      data.labels.push(moment().format('HH:mm:ss'))
      data.datasets[0].data.push(msg.value) //msg.value is actually the {'value': smoke_value} from Flask
      chart.update()

    })
Notice how SocketIO on the client side then catches this message and tells Chart.js to plot this value (last 2 lines). After another second, the server pushes another value, the cycle repeats and ultimately a nice looking chart is created!
Writing javascript directly in html is a pretty terrible idea in practice, but this will do for our demonstration.
Now as you recall, this is a bi-directional communication meaning the client can also send some sort of data back to the server. To get a better idea of how that works, we'll change our default settings we predefined when we launched our app.
#app.py
config = {
    'alarm_level_threshold': 0.04,
    'alarm_update_interval': 60,
    'sensor_reading_delay': 1
}
Now with some clever Jquery usage we can emit another message ('Changing values') when a certain button is clicked grabbing the input value.
//index.html
$('button.name').on('click', function(event) {
        var parentId = $(this).parent().attr('id');
        socket.emit('Changing values', {key: parentId, data: $('#'+parentId+'>input').val()});
        return false;
    });
Then the server catches this message (event) and changes our config variables accordingly. Likewise, the server then emits what changes were made.
#app.py

@socketio.on('Changing values')
def value_change(message):
    config[message['key']] = float(message['data'])
    socketio.emit('update value', {'key':message['key'] , 'value': message['data']})
Speaking of alarm.py Here we define our "alarms".
For this tutorial, I've only added beeps and emails for demonstration purposes, but you can easily change or expand this Alarm class with something that suits your needs.
Maybe add SMS alerts or even build your own fire suppression system and let our smoke detector activate it! Neat idea, right ?
Then in app.py we can create an instance of Alarm class use those alarms when the smoke value is above certain threshold. Like so:
 if smoke_value > config['alarm_level_threshold']:
                print('!!!!!!!!!!!!!!!FIRE ALARM!!!!!!!!!!!')
                beep_thread = threading.Thread(target = alarm.beep)
                beep_thread.start()
                if (time.time() - last_epoch) > config['alarm_update_interval']:
                        last_epoch = time.time()
                        email_thread = threading.Thread(target=alarm.send_email)
                        email_thread.start()
One thing to note here is that we use threads so those alarms won't block our main thread.
Running our Smoke Detector on Startup
Now in case you're planning on using our newly built Smoke detector somewhere, it would be wise to actually make our app run on startup. Meaning we wouldn't need to SSH into your Rpi to manually start the app every time we reboot our device or something unexpected happens.
I personally use Supervisor . It's very simple to use, yet very powerful tool for process management on your Linux machine.
Let's get it by
sudo apt-get install -y supervisorNext, we have to tell Supervisor that our app should be launched at startup. We'll create a config file that basically stores the instructions for Supervisor. Let's start by navigating to the directory where our config file must be placed.
cd /etc/supervisor/conf.dNow create a new file:
sudo touch smokedetector.confOpen it with your favorite text editor:
sudo nano smokedetector.confAnd copy these lines:
[program:SmokeDetector]
directory=/home/pi/rpi-smoke-detector
command=/home/pi/rpi-smoke-detector/venv/bin/python3 /home/pi/rpi-smoke-detector/app.py
autostart=true
autorestart=true
Change your paths accordingly. This example assumes you used virtual enviroment and cloned the repository.
Next execute:
sudo supervisorctl reread
sudo supervisorctl update
Now you can check whether our app is running simply by:
sudo supervisorctlI'm not going further into details what you can do with Supervisor, but just know that you can actually log the output of your smoke detector, enable web interface to monitor if the app is running etc... Google is your friend.
The end
And... we're actually done! I hope you learned a thing or two along the way and got a better understanding of how Raspberry Pi can be used for IoT. Enjoy your Smoke Detector, but don't forget that this MQ2 sensor can be used for many other applications, so I can't wait to see what you make out of it! Drop your ideas, questions and general feedback in the comments!
Until then, happy hacking!


